Posts

Project stage 3 Integrate, Tidy, & Wrap

 The project code's location in class git repository should be under  https://github.com/Seneca-CDOT/gcc/tree/2024-S-tests/gcc/testsuite/g%2B%2B.target/aarch64  with folder name afmv, but its still waiting for review required approve.   It is located in my branch waiting for the merge:  https://github.com/zijunlii/gcc/tree/master/gcc/testsuite/g%2B%2B.target/aarch64/afmv The directory structure is as follows: gcc/testsuite/g++.target/aarch64/  └── afmv/         ├── afmv_test_1.c         ├── afmv_test_1. exp          ├── afmv_test_2.c         ├── afmv_test_2. exp          ├── afmv_test_3.c         ├── afmv_test_3. exp          └── Makefile The AFMV capability correctly creates and executes multiple versions of functions. Only basic functionality is verified. More complex functions ...
Project stage 2 Implementation

In this project, we aimed to implement and test AFMV capability in the GCC for AArch64 systems. AFMV allows the compiler to automatically create multiple versions of a function optimized for different processor features, thereby enhancing performance without requiring manual intervention from the developer. To implement and test the AFMV capability, we created a series of test cases that define functions with the target_clones attribute. link to github: https://github.com/zijunlii/gcc/tree/master/gcc/testsuite/g%2B%2B.target/aarch64/afmv Test cases: 1. Test to verify that multiple versions of a simple function foo are created and executed correctly.  #include <stdio.h> __attribute__((target_clones("default", "sse4.2", "avx2"))) void foo() {     printf("Function foo\n"); } int main() {     foo();     return 0; } 2. Test to verify AFMV functionality with different optimization levels, ensuring that the function bar is optimized and executed ...

lab 3 assembly language

In lab 3, we explored writing assembler programs for different architectures, including x86_64 and AArch64. We unpacked the provided code examples and built and ran C and assembler programs. The goal was to understand the differences in writing and debugging assembler code across these architectures. Writing assembler code is a unique challenge compared to higher-level languages like C. The need to understand the hardware's instruction set and architecture is crucial. Debugging is more difficult because of the low-level nature of the assembler, where each instruction directly manipulates the CPU's state. For instance, while writing the AArch64 loop program, I had to carefully manage register values and ensure correct syscall invocations. It goes the same for the x86_64 programs with its even richer and more complex instruction set. I think 6502 Assembler is a simple instruction set, easier to learn but limited in capabilities. x86_64 Assembler is a rich instruction set, comple...

Project stage 1 navigate GCC codebase

Continues from the previous build GCC, this involves navigating the GCC codebase to understand and modify specific components such as compilation passes, argument parsing, and producing dumps during compilation passes. 1. Compilation passes: The code for compilation passes is in the gcc/passes.c file. Compilation passes are managed using the pass_data structure. To add a new pass, we will create a new file gcc/my_pass.c: #include "gcc-plugin.h" #include "tree-pass.h" static unsigned int my_pass_execute(void) {     return 0; } struct opt_pass my_pass = {     .type = GIMPLE_PASS,     .name = "my_pass",     .gate = NULL,     .execute = my_pass_execute, }; int plugin_init(struct plugin_name_args *plugin_info,                 struct plugin_gcc_version *version) {     return 0; } To test the new pass we will add the pass to the pass manager in gcc/passes.c and recompile GCC. 2. Argume...

Project stage 1 GCC build

This is the project stage 1, we will become familiar with the GCC build process on AArch86 and x86 platforms.  1. Clone the GCC repository from the official source git clone git://gcc.gnu.org/git/gcc.git cd gcc For AArch86 2. Creating build directory and configure GCC for AArch64 mkdir build-aarch64 cd build-aarch64 ../configure --target=aarch64-linux-gnu --prefix=$HOME/gcc-aarch64 --disable-multilib 3. Starting the build process and install GCC  make -j$(nproc) make install For x86 2. Creating build directory and configure GCC for x86 mkdir build-x86 cd build-x86 ../configure --prefix=$HOME/gcc-x86 --disable-multilib 3. Starting the build process and install GCC make -j$(nproc) make install While working on this project I leanred the build process and the necessary configurations for different architectures. The challenges was dealing with build dependenicies and managing long build times.

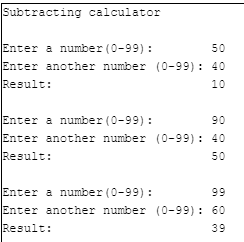
lab 2 subtracting calculator

Image
As part of my lab 2 of using 6502 assembly, i have decided to work on a subtracting calculatror. It was based on a simple adding calculator provided. It prompted the user to enter two numbers, added them together and display the results. One of the main challenges was when changed from adding to subtracting calculator, it was the second number subtracts the first number input, so I have to make more changes to ensuring that the first number was subtracted from the second number and not the other way around. Another challenge was handling binary-coded decimal subtraction correctly. The initial attempts resulted in incorrect results, which were quite puzzling. The one minnor issue remaining is I have to hit enter twice for each input.   ; Subtracting calculator ; ROM routine entry points define SCINIT $ff81 ; initialize/clear screen define CHRIN $ffcf ; input character from keyboard define CHROUT $ffd2 ; output character to screen define SCREEN $ffed ; get scr...

lab 1 mob programming

In this lab our focus was on the 6502 Emulator, a tool that simulates the classic 6502 microprocessor. The task involved filling a bitmapped display with different colors and optimizing the performance of the code. This blog post will outline our experiments, performance calculations, code modifications, and personal reflections on the process. Initial Code:  lda #$00    ; set a pointer in memory location $40 to point to $0200 sta $40     ; ... low byte ($00) goes in address $40 lda #$02     sta $41     ; ... high byte ($02) goes into address $41 lda #$07    ; colour number ldy #$00    ; set index to 0 loop:   sta ($40),y  ; set pixel colour at the address (pointer)+Y     iny     ; increment index     bne loop    ; continue until done the page (256 pixels)     inc $41     ; increment the page     ldx $41  ...